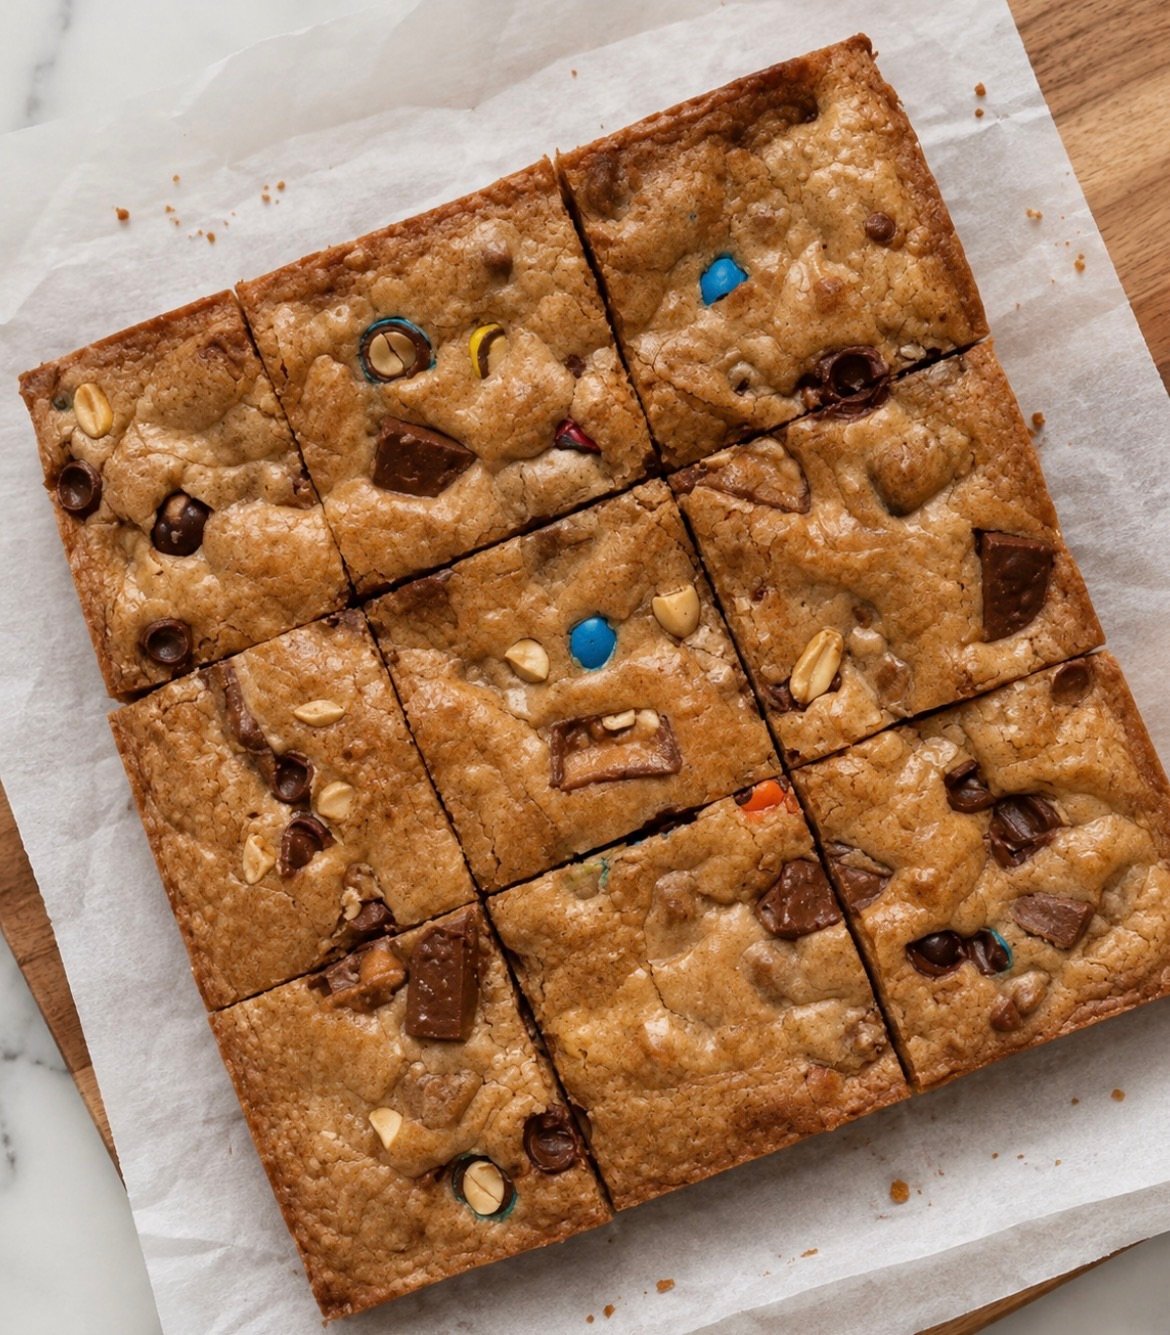
Leftover Halloween candy cookies are just a basic brown sugar cookie dough with chopped candy bars folded in and pressed on top, baked as one pan of bars instead of individual scooped cookies. You dump in whatever chocolate candy is left in the bowl, chop it small, and let the oven do the rest.
I make a batch of these every single year, usually around November 2nd when the candy bowl has turned into a sad pile of stuff nobody wanted. It’s less baking and more triage. You’re not following a recipe so much as rescuing one from a bag of loot.
This one covers which candy actually holds up in the oven, which candy turns into a weird rubbery mess, and the exact bake time that keeps the middle chewy instead of dry. I’ll also walk through my mistakes, because I made most of the common ones already so you don’t have to.
Key Takeaways
- Chocolate-based candy bars (Kit Kat, Snickers, Twix, M&Ms, Reese’s, Milky Way) are the best base for cookie bars
- Skip gummies, hard candy, and taffy entirely, they don’t melt right and turn oddly chewy or stay rock hard
- Chop candy small, about half-inch pieces, so caramel and nougat don’t pool into sticky puddles
- Bake at 350°F for 25 to 30 minutes and pull the pan while the center still looks slightly underdone
- A 9×13 pan gives you thinner, snackable bars, an 8×8 pan gives you thick, brownie-style squares
Table of Contents
What candy actually works in cookie bars
I’ve made this with basically every candy that’s ever come home in a pillowcase. The short version: anything built on a chocolate bar base works.
- Kit Kat – works fine, but chop it small (more on this below)
- Snickers, Milky Way, Twix – the caramel and nougat inside stay contained once baked, as long as pieces aren’t huge
- Reese’s Peanut Butter Cups – my personal favorite, the peanut butter filling gets soft and almost fudgy
- M&Ms, Reese’s Pieces – hold their shape well, good for pressing on top for looks
- Hershey bars, Almond Joy, Heath bars, Rolos, Butterfinger – all chop and bake beautifully
Basically, if it’s a candy bar you’d eat cold out of the fridge, it’s a candy bar that survives the oven.
What to leave out of the bowl
Not everything from a Halloween haul belongs in cookie dough. Some candy just doesn’t behave once it hits 350 degrees.
- Gummies (worms, bears, any fruit shape) – they don’t melt so much as seize up into a tough, chewy nugget
- Hard candy (lollipops, butterscotch discs, Jolly Ranchers) – stays hard in the center and can crack a tooth if someone bites down wrong
- Skittles, Nerds, Starburst, Twizzlers – the sugar shell either scorches or turns gluey instead of melting
- Candy corn – technically fine in small amounts, but it goes syrupy and can make the dough greasy if you use too much
I tossed a handful of gummy worms into a batch a couple years back because I didn’t want to just throw them away. Bad move. They turned into these weird rubbery blobs that never fully melted and pulled the chew right out of the surrounding dough. I pick them out of the candy bowl now before I even start chopping.
How to make leftover Halloween candy cookie bars
- Preheat your oven to 350°F and line a 9×13 pan with parchment paper, leaving a little overhang on the sides.
- Cream the softened butter with brown sugar and granulated sugar until light and fluffy, about 2 minutes.
- Beat in the eggs one at a time, then mix in the vanilla.
- In a separate bowl, whisk together the flour, baking soda, and salt.
- Add the dry ingredients to the butter mixture and mix just until combined, don’t overmix or the bars turn tough.
- Fold in about two cups of the chopped candy, saving the rest for the top.
- Spread the dough evenly into the pan and press the remaining candy pieces into the surface.
- Bake for 25 to 30 minutes, until the edges are golden and set but the center still looks slightly soft.
- Cool completely in the pan, at least an hour, before lifting out and slicing into squares.
That resting time matters more than people think. Cookie bars keep cooking a little from residual heat, and slicing too early gets you a gooey mess instead of clean bars.
The mistakes I made so you don’t have to
The first time I made these, I chopped a whole Kit Kat bar into big chunks and folded it straight into the dough.
By the time the bars cooled, the wafer layer had gone soft and slightly soggy in the middle, almost like a stale cracker. Now I chop Kit Kats smaller than everything else, closer to a quarter inch, so there’s less wafer surface soaking up moisture from the dough.
Caramel taught me a rougher lesson. I once tossed in an unchopped fun-size Milky Way, and it melted into a molten caramel pocket that welded itself straight to the parchment paper. I had to practically pry that corner of the bar loose.
Since then I chop every caramel or nougat candy into small, even pieces before it goes anywhere near the dough, and I press bigger pieces on top instead of burying them in the middle where they can’t spread out.
If you’re using a glass baking dish instead of metal, drop the temperature to 325°F. Glass holds heat longer, and I’ve scorched a bottom layer of bars by baking a glass 9×13 at the same 350°F I’d use for a metal pan.
Storage and freezing
These bars keep at room temperature in an airtight container for about 4 days. I usually put a piece of parchment or wax paper between layers so the candy pieces don’t stick everything together.
For longer storage, wrap individual squares tightly and freeze for up to 3 months. I pull one out of the freezer straight into my lunch bag most mornings in November and it’s thawed by lunchtime.
Pan size and a few tools that help
I bake these in a heavy metal 9×13 pan, this USA Pan rectangular cake pan is the one I reach for because the coating releases the bars cleanly even with sticky candy baked right onto the surface. For an 8×8 pan and thicker bars, cut the bake time down to about 30 to 35 minutes and check a few minutes early.
I also keep precut parchment sheets, like these 9×13 Katbite sheets, on hand specifically for pans like this. Cutting parchment to fit a 9×13 by hand every time gets old fast, and the precut sheets mean one less thing to think about when the candy bowl needs dealing with.
The bowl doesn’t have to go to waste
Leftover Halloween candy doesn’t need to sit in a bowl on the counter getting stale and sad. One batch of these bars uses up a genuinely absurd amount of candy in one afternoon. Chop what melts well, skip what doesn’t, and you’ve got a dessert instead of a guilt trip every time you walk past the kitchen counter.
Frequently Asked Questions
Can I use candy corn in cookie bars?
Yes, in small amounts. Too much makes the dough syrupy, so I keep it to about a quarter cup mixed in with other chopped candy rather than using it alone.
Do I need to chill the dough before baking?
No, this dough bakes straight from mixing. Chilling isn’t necessary for bars the way it sometimes is for scooped cookies.
Why did my cookie bars turn out greasy?
Overmixing the dough or using too much soft caramel candy are the usual culprits. Stick to the mix-just-until-combined step and chop caramel candy small.
Can I freeze the cookie bars unbaked?
Yes, you can freeze the raw dough in the pan, wrapped tightly, for up to a month. Bake straight from frozen and add about 8 to 10 extra minutes.
What size pan works best for this recipe?
A 9×13 pan gives thinner, more snackable bars. An 8×8 or 9×9 pan gives thicker, brownie-style squares with a longer bake time.
Leftover Halloween Candy Cookie Bars
Ingredients
- 1 cup unsalted butter, softened (2 sticks)
- 1 cup packed brown sugar
- ½ cup granulated sugar
- 2 large eggs
- 2 tsp vanilla extract
- 2¾ cups all-purpose flour
- 1 tsp baking soda
- ½ tsp salt
- 2½ cups chopped leftover Halloween candy, divided (chocolate bars only, seenotes)
Instructions
- Preheat oven to 350°F. Line a 9×13 pan with parchment paper, leaving overhang on the sides.
- Cream butter, brown sugar, and granulated sugar together until light and fluffy, about 2 minutes.
- Beat in eggs one at a time, then mix in vanilla.
- In a separate bowl, whisk flour, baking soda, and salt.
- Add dry ingredients to the butter mixture and mix just until combined.
- Fold in 2 cups of the chopped candy.
- Spread dough evenly in the pan and press remaining 1/2 cup candy into the top.
- Bake 25 to 30 minutes, until edges are golden and center is set but still slightly soft.
- Cool completely in the pan, at least 1 hour, before slicing into squares.
Notes

Cynthia Odenu-Odenu is the founder of Cyanne Eats. A registered nurse with a passion for food, she brings the same attention to detail from her professional life into the kitchen. From chain restaurant rankings to grocery finds and easy recipes, Cynthia covers it all and helps everyday food lovers eat better and spend smarter.