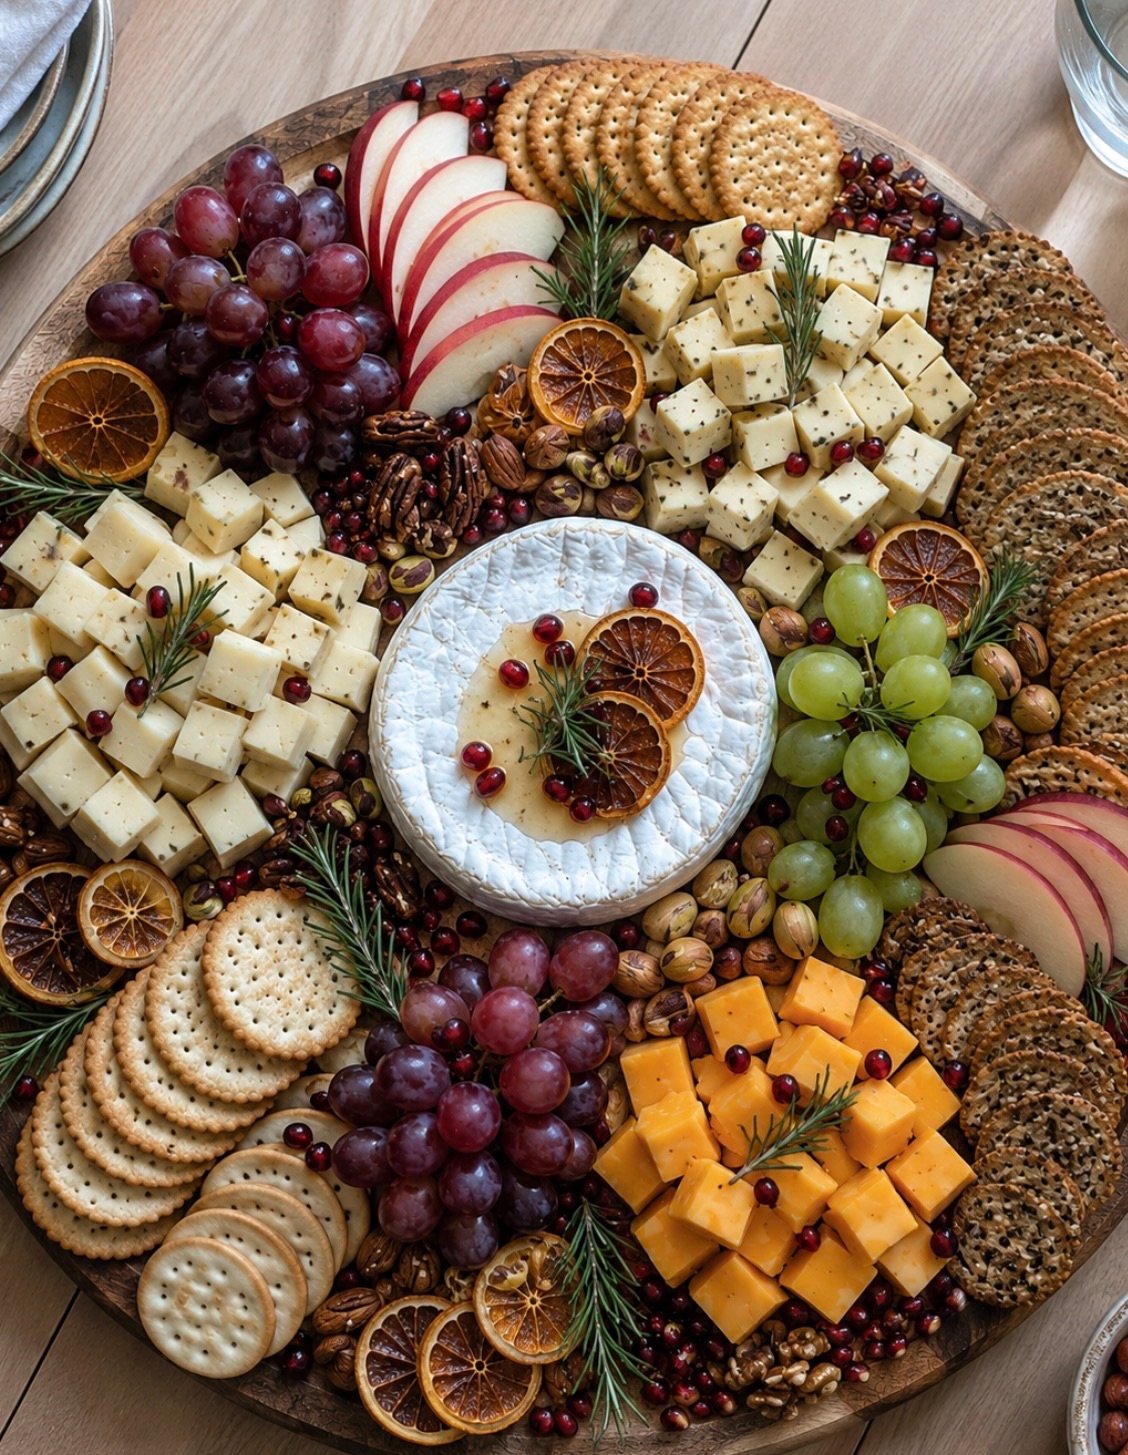
The cheapest way to build a christmas themed charcuterie board is to buy two blocks of cheese instead of a pre-sliced variety pack, cut each block three different ways to fake the look of four or five cheeses, and lean on rosemary sprigs, pomegranate seeds, and homemade dried orange slices for the festive color instead of specialty holiday garnishes.
I used to buy those pre-arranged holiday cheese trays at the grocery store because they looked done already. Then I actually did the math on what I was paying per ounce for cheese somebody else had already cut into triangles, and I stopped.
My first real budget board attempt was a mess: I bought three separate cheeses, ran out of money for garnish, and the whole thing looked like a sad plate of crackers with some cheddar on it.
The fix wasn’t buying more cheese. It was cutting the cheese I already had smarter and spending the leftover cash on things that make a board look Christmas-y for pennies. This is the exact method I use now every December, and it costs me under $30.
It’s the same gap-filling logic I use for my breakfast grazing board, just dressed up for the holidays instead of a weekend brunch. I always keep a box of Carr’s Table Water Crackers in the pantry for this exact project, since sturdy crackers matter more than fancy ones once cheese and fruit start piling on top.
Key takeaways
- Buy cheese in block form, not pre-sliced or pre-crumbled. You’re paying a real markup for someone else doing five minutes of knife work.
- Two blocks cut three different ways (sliced, cubed, and shaved into ribbons) reads as four to five different cheeses on the board.
- Rosemary sprigs, pomegranate arils, and dried orange slices do the “Christmas” visual work that a $15 specialty cheese never needs to.
- Filling empty space with cheap fruit and crackers matters more than adding another expensive cheese.
- A board built this way runs $25 to $35 for six to eight people, compared to $100 or more for a pre-made holiday spread.
Table of Contents
Why pre-sliced cheese is the first thing to cut
I ran a real comparison at my own grocery store last December. A block of sharp cheddar was running about $4.50 a pound.
The pre-sliced version of the exact same cheddar, same brand, was closer to $6.50 a pound for less cheese in the package once you weighed it out. That’s not a small gap when you’re feeding a table of eight people.
Pre-crumbled and pre-shredded cheese is even worse: you’re paying for the packaging and the extra step, and on a board that’s going to get cut and rearranged anyway, that convenience buys you nothing.
Block cheese also lasts longer in the fridge, so if you’re building the board a day ahead like I always do, it won’t dry out the way thin pre-cut slices do.
The two-block, three-cut method
Most budget board advice stops at “buy block cheese.” That saves money, sure, but it doesn’t fix the sparse, boring look that made you want a fancier board in the first place.
What actually changes the board is cutting one block three different ways. A single wedge of sharp cheddar can become thin slices fanned out on one side, small cubes stacked in a bowl on another, and a few thick planks cut on a diagonal for height.
I do this with two blocks total: one sharper, firmer cheese like an aged cheddar or gouda, and one softer, milder one like brie or a smoked gouda. Six little clusters from two blocks look like a full cheese course, not two cheeses stretched thin.
Hero cheese (splurge a little): A small wheel of brie or a wedge of good smoked gouda, cut into wedges and left mostly whole so it stands out as the centerpiece.
Budget block (the workhorse): A block of sharp cheddar, Colby jack, or Swiss, cut three ways as described above to fill most of the visual real estate on the board.
Filler that isn’t cheese: Crackers, a sliced baguette, apple slices, grapes, and a handful of nuts. These are cheap per person and take up more space than another $8 cheese wedge ever will. A bag of Blue Diamond Lightly Salted Almonds is what I actually reach for, since it’s already portioned for snacking and there’s no shelling or roasting involved.
Getting the Christmas look without Christmas prices
I used to think a themed board needed themed products, like a snowman-shaped cheese spread or a “holiday blend” cracker mix that costs twice as much for the same crackers in a red box. It doesn’t.
Rosemary sprigs: A few dollars at any grocery store, and tucked between cheese clusters they read as little sprigs of evergreen. I sometimes lay a longer piece down the middle of the board in a loose tree or wreath shape.
Pomegranate arils: These look like tiny red ornaments scattered across a board, and one pomegranate gives you more seeds than you’ll actually use in one sitting.
Dried orange slices: I slice oranges thin, about a quarter inch, blot them dry, and bake them at 200°F for two to four hours, flipping every half hour or so. They come out looking like little stained glass windows and cost almost nothing beyond the fruit itself.
If you’d rather skip the oven step, dried orange slices already cut and dried work fine and keep for months, which is handy if you’re prepping ahead of a party.
How I actually assemble it
- Set the hero cheese down first, slightly off-center, since everything else gets arranged around it.
- Add the cut-up budget cheese in three separate clusters around the board, spacing them so no two clusters touch.
- Fill the gaps between cheese clusters with crackers, standing some up and laying others flat for height variation.
- Tuck fruit (grapes, apple slices, or a few berries) into the leftover gaps, breaking up any spot where two similar colors sit next to each other.
- Scatter the rosemary sprigs, pomegranate arils, and dried orange slices last, since they’re your smallest items and easiest to place around everything else.
- Fill any remaining bare spots with nuts, since they’re cheap and take up space without costing much.
The biggest thing I learned the hard way is that a board looks sparse when there’s too much empty wood or slate showing, not when there isn’t enough cheese. Once I started thinking about filling gaps instead of buying more cheese, the whole problem solved itself.
One small bowl I always tuck into a gap now is fig spread. A jar lasts through multiple boards, and it makes the budget cheddar taste a lot more expensive than it is. A drizzle of Nature Nate’s Raw Honey over the brie does the same job if fig spread isn’t in your cart that week.
A basic cheese knife set makes the cutting step faster too, since the shapes above are much easier with a proper cheese knife than a regular kitchen knife.
Cost breakdown: pre-made board vs. this method
| Item | Pre-made holiday tray | Two-block DIY method |
| Cheese | $18 to $25 for a small pre-sliced tray | $9 to $12 for two blocks |
| Meat | Included, often thin and sparse | $6 to $8 for salami or pepperoni |
| Garnish | Usually none or plastic holly | $3 to $5 for rosemary, pomegranate, oranges |
| Crackers/bread | Small packet included | $3 to $4 |
| Total | $30 to $45 for a small tray | $25 to $35 for a full-size board |
The DIY version isn’t always cheaper by a huge margin, but it feeds more people and looks fuller for close to the same money.
It doesn’t take a fancy board to look finished
I’ve made this exact spread on a plain cutting board and on an actual wooden serving board, and honestly the cheese and garnish do more work than the board underneath it. What matters is the cutting technique and the gap-filling, not what you’re setting it all on.
If you’re hosting more than once this season, I do think a proper board is worth having around since a cutting board gets slippery once cheese starts sweating. A wood charcuterie board with a built-in drawer keeps the knives and little serving bowls in one place, which is more useful than it sounds once you’re assembling this on a deadline. But it’s the last thing I’d spend real money on for this project.
And if you’re rounding out the rest of the table, my Trader Joe’s appetizers and party foods ranking has a few more easy additions that don’t need a recipe.
Build it once and you’ll stop thinking of it as a project. Now I just glance at the empty spots on the board and know what goes where, same as I know where the salt is in my own kitchen.
Frequently asked questions
How much cheese do I need per person for a Christmas board?
Plan on about 2 to 3 ounces of cheese per person if it’s an appetizer alongside a full meal, or 4 ounces per person if the board is the main food for the gathering.
What’s the cheapest cheese that still looks impressive on a board?
A block of sharp cheddar or Colby jack cut into varied shapes looks far more expensive than it is, especially paired with one small splurge cheese like brie.
Can I make this board ahead of time?
You can prep the cheese cuts and dried orange slices a day ahead and store them separately, but I always assemble the full board within an hour or two of serving so the fruit doesn’t brown.
What can I use instead of a wooden board?
A large plate, a baking sheet lined with parchment, or a marble slab all work fine. Anything flat with enough surface area will do the job.
Do I need specialty Christmas-shaped crackers or cheese?
No, plain crackers and regular block cheese look festive once the garnish and arrangement are in place. The shape of the food matters far less than the color and the gaps between items.
Budget Christmas Cheese Board
Ingredients
- 8 oz 8 oz brie or smoked gouda (hero cheese)
- 8 oz block sharp cheddar or Colby jack (budget cheese, cut three ways)
- 4 oz salami or pepperoni, sliced
- 1 cup crackers or sliced baguette
- 1 cup red grapes
- 1 apple, sliced
- ½ cup pomegranate arils
- ¼ cup mixed nuts
- 3 to 4 sprigs fresh rosemary
- 6 to 8 dried orange slices
- Figjam or honey for serving
Instructions
- Cut the budget cheese block into three shapes: thin slices, small cubes, and thick diagonal planks.
- Place the hero cheese slightly off-center on the board and cut it into a few wedges.
- Arrange the three cheese cuts in separate clusters around the hero cheese, leaving gaps between them.
- Fill the gaps with crackers, standing some upright and laying others flat.
- Tuck grapes and apple slices into remaining gaps, alternating colors so nothing similar sits next to itself.
- Scatter rosemary sprigs, pomegranate arils, and dried orange slices across the board.
- Fill any last bare spots with nuts, and add a small bowl of fig jam or honey for serving.
Notes

Cynthia Odenu-Odenu is the founder of Cyanne Eats. A registered nurse with a passion for food, she brings the same attention to detail from her professional life into the kitchen. From chain restaurant rankings to grocery finds and easy recipes, Cynthia covers it all and helps everyday food lovers eat better and spend smarter.